Learn To Connect Scales with Triads - Overview
I’ll show you a very simple but powerful principle to conceptualize and practice scale patterns with triads. Watch Part 1 to learn the basic principle and practice the exercises there.
This alone will probably level up your game a good chunk because you’ll learn to play the basics of scales and triads as well as to connect both worlds.
Once you feel comfortable with Part 1, feel free to extend this exercise to bigger arpeggios by watching Part 2 and leveling up even more, by connecting all triad shapes vertically.
Table of Contents
Part 1 - The Foundation
Before you can connect scales to triads, it’s obvious that you need to be able to play both separately—the scales and the triads. If you don’t know how to play either of these, then don’t worry. I’ll show you both so that you can follow along with this powerful exercise and benefit from practicing it.
Step 1: Foundational Scale Exercise
To start, master playing the C major or A minor scale horizontally on a single string. The notes are simply ABCDEFG without any flats or sharps. This will serve as our foundation for the exercise.
To play a scale comfortably on a single string it’s best to use pattern like the following:

Once comfortable, extend the practice to all six strings. Ensure you’re familiar with playing the pattern along the fretboard, as this will be crucial for connecting triads later.
Practice Steps:
Master C major/A minor scale horizontally on one string.
Extend the practice to all six strings.
Building a strong foundation here is essential. It sets the stage for understanding scale-to-chord connections in the next steps.
So this is what you need to practice before we can move on:

Step 2 Connecting Scales To Chords
To seamlessly connect scales with triads, it’s crucial to recognize potential triads within a scale.
Start by examining our single pattern—a three-note sequence on a string.
Focus solely on the top and bottom notes, disregarding the middle note.
Why?
The outer notes of this pattern create intervals of either a minor third or a major third.
This forms the basis of a triad, which consists of two stacked thirds—either major-minor for a major triad or minor-major for a minor triad. Every three-note pattern essentially represents an unfinished triad, providing us an opportunity to fill in the missing third. This makes the scale to chord connection possible.
Now, let’s illustrate this concept with an example.
Place your index finger on the eighth fret and your pinky on the twelfth fret of the high E string, playing the notes C and E—Which are a major third.
Ask yourself: which triad includes the notes C and E? In the key of C major, two triads fit the bill—the C major triad (Notes: C E G) and the A minor triad (Notes: A C E).
By playing this pattern, you effortlessly transition between C major and A minor triads.
Example:

You can take a look at this chart to find out which notes the triads in the key of C-Major consist of, so that you can easily recognize which third belongs to which triad:

Step 3 Practice The Scale To Chord Connections
Just through this exercise and you’ll see how it works. But if you struggle with this, then go through the scale exercise in the previous section as well as the triad practice in the last section separately.
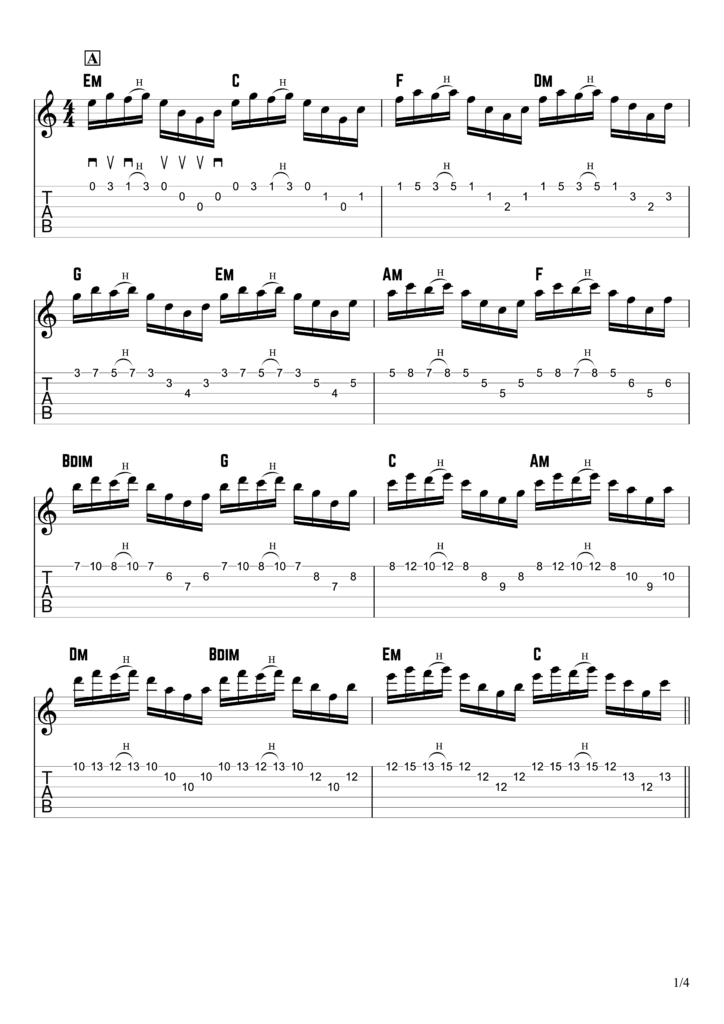
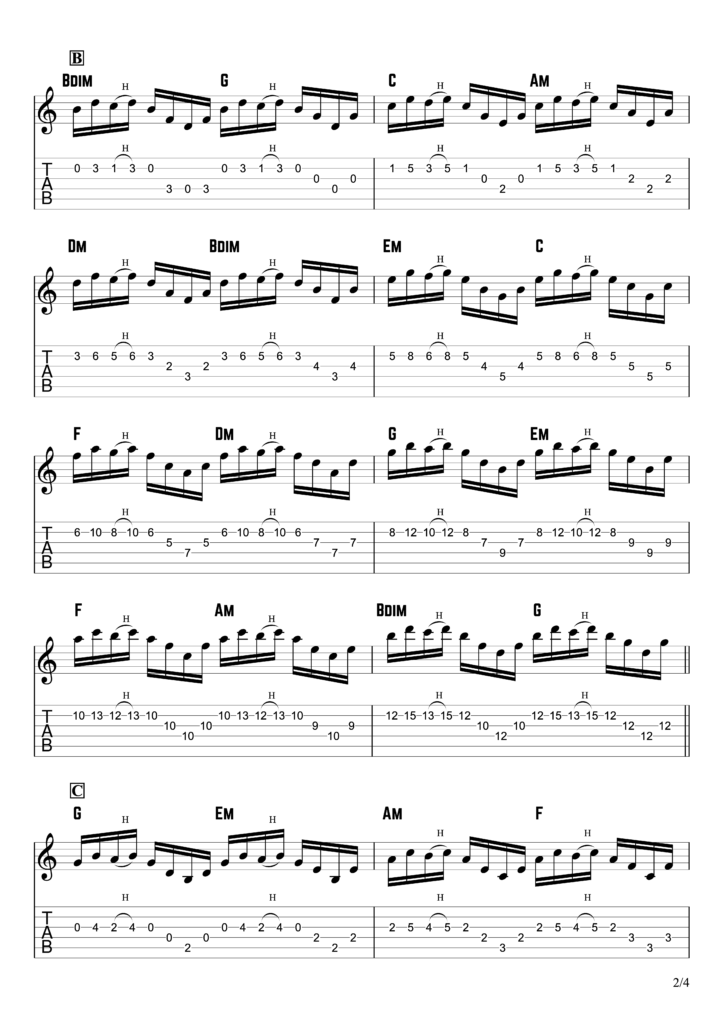
Tablature Part 1


Practice Triads
If you’ve never practiced triads before, then this exercise might be overwhelming. Here, I suggest that you practice both exercises, the one-string pattern and the triads separately, so that you can prevent being overwhelmed by combining both exercises in one single step. So let me quickly show you how you can practice the triads that you need for this exercise.
Just go through this exercise and you will see how everything will come together, once you can play the scale and the triads separately.

Part 2 - Big Arpeggios
The next step is to extend the exercise from part 1 and play big arpeggios over 5 to 6 strings, instead of the simple 3-note arps.
The principle is extremely simple. You just need to connect the triads that you hopefully practiced in part 1 vertically along the fretboard.
That is really it. But unfortunately, these bigger arpeggios are relatively hard to play and require long stretches. So be prepared for this. But having mentioned this, it is obvious that this exercise is also a very good technique exercise. Such arpeggios are notoriously hard to play on the guitar. So be patient, it takes time, but it’s also worth the effort.
Tablature Part 2


Fantastic exercises to progress , very well explained.
A tremendous thank you.
Thank you, Patrick! Appreciate you for commenting here!
Leçon originale et très utile.
Merci beaucoup, Christian! Je suis ravi que vous ayez trouvé la leçon originale et utile.
Sorry Luis, but there is no download for the tabs.
Thank you
great man
Sir, thank you for your great lessons. God bless.
My pleasure. Thank you, Pablo!
great lessons
Thank you! Glad you like them.
Que grandes ejercicios,muchisimas gracias por compartir tus conocimientos.
My pleasure! Thanks for commenting my friend!
Thank you very much! Very instructive
Thanks!