Check out the free resources for this lesson. There, you’ll find the tabs for all intervals, the tabs for the intro solo and some additional tools that you can print out and use in your guitar practice.
No email opt-in needed…
Just in case you have missed part 1, here it is:
How to build a strong fretboard understanding 1/5 – Horizontal diatonics
In that lesson, I demonstrate an excellent exercise that helps you memorize all the notes on the fretboard while improving your technique at the same time. If you haven’t started there yet, I highly recommend doing so. It’s the most crucial foundation for nearly everything you’ll learn moving forward.
Table of Contents
Why intervals are important
If you seriously want to master the fretboard then you need to learn intervals. Period.
Understanding and practicing intervals will not only solidify your fretboard knowledge—because it really is a note location exercise—but it’s also the very foundation for understanding almost all of music theory.
Most concepts, like chords and scales, are explained using intervals. That’s why you must have a solid theoretical and practical understanding of basic intervals before you can fully grasp what a chord or scale even means.
When you practice the exercises from this video alongside the exercise from part one of this series, they become even more powerful because you’ll be forced to think about note names to play the intervals correctly.
While the exercise from Part 1 of this series is quick to learn, it’s easy to fall into the trap of playing it mechanically without fully grasping the note names, which can slow your progress. But by adding the interval exercise I’m about to show you, you’ll not only solidify your fretboard knowledge but also lay the groundwork for mastering music theory.
It’s a powerful combination.
Let’s dive in
Mastering Intervals on the Guitar: A Horizontal Approach
In this exercise, we will focus on a horizontal approach to playing intervals, just like the first exercise in this series.
Before diving in, it’s essential that you’re comfortable with at least the note names of the C major scale, or the natural notes. If you’re not familiar with this, locating intervals might feel challenging. In that case, I highly recommend revisiting part one of this series and practicing until you’re confident in both playing and naming the notes.
If you’re not familiar with the music theory behind intervals, don’t worry. In part three of this series, I’ll explain the essential theory in detail. For now, understanding the theory isn’t crucial. It’s perfectly fine if you don’t fully grasp the concept at this point. The key is to focus on playing the intervals horizontally across the fretboard. As you gain more practical experience, the understanding will naturally follow. So, for now, trust the process and keep practicing!
The Two Core Instructions
Here’s how this exercise works: You will play through the notes of a single key, such as C major, moving horizontally along one string. Each note becomes a starting point to play an interval. On the high E string, for example, the notes are E, F, G, A, B, C, D, and so on. Each of these notes serves as a reference point for playing intervals.
So, you’ll start by playing an interval from E, then move to the next note, F, and play the same interval starting from F. You’ll continue this pattern, moving to G, then A, and so on, until you reach the end of the fretboard.
- Stay within the key. Use only the notes of the key you are playing in.
- Play basic intervals. Focus on intervals of 2, 3, 4, 5, 6, 7, and 8, starting from every note in the key, played horizontally on a single string.
With these guidelines in mind, let’s break down how to approach this exercise.
Starting in C Major: The High E String
We’ll begin on the high E string, and since we’re sticking to the C major key, we’ll use only natural notes. This means you’ll be playing A, B, C, D, E, F, and G.
Counting Intervals on the Guitar
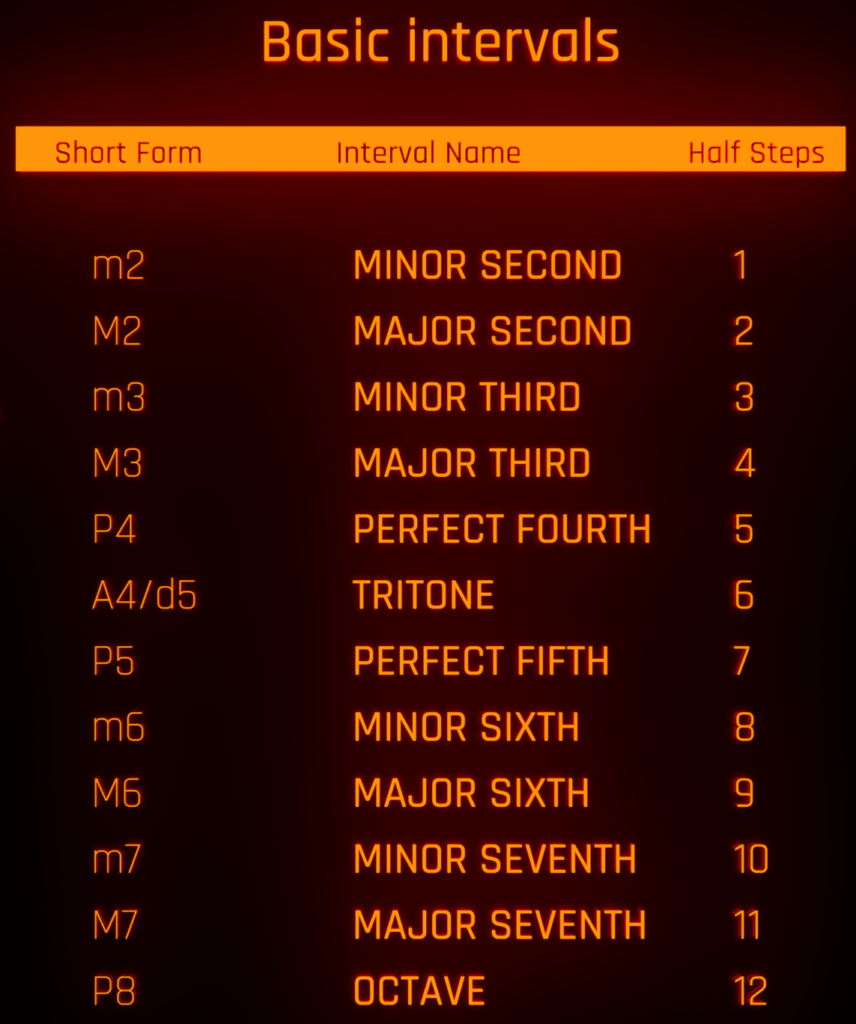
Counting intervals on the guitar can be tricky. Each interval has a specific number of half steps, and while this system is accurate, memorizing the half steps can feel arbitrary. For example:
- A perfect fifth consists of seven half steps.
- A major third consists of four half steps.
Instead of focusing on memorizing these half steps, we can use the actual numbers of the intervals themselves to count more intuitively. For example:
- To find the fifth, count five notes.
- To find the third, count three notes.
This way, you won’t have to worry about the exact number of half steps for each interval.
Finding the Perfect Fifth
Let’s try an example. We’ll look for a perfect fifth starting from E on the high E string in the key of C major. Remember, we are only using the notes of this key.
To find the fifth, count the notes:
- E is the first note (1).
- F (first fret) is the second note (2).
- G (third fret) is the third note (3).
- A (fifth fret) is the fourth note (4).
- B (seventh fret) is the fifth note (5).
So, the perfect fifth from E is B (on the seventh fret).
Finding the Seventh
Now, let’s look for the seventh starting from G.
Here’s how we count:
- G is the first note (1).
- A is the second note (2).
- B is the third note (3).
- C is the fourth note (4).
- D is the fifth note (5).
- E is the sixth note (6).
- F is the seventh note (7).
So, the seventh from G is F (located on the 13th fret).
The Key to Success: Knowing Your Notes
As you can see, the trick to mastering this exercise is knowing the notes of the key and their locations on the fretboard. This is a fundamental skill that will make interval counting and playing much easier.
But don’t worry if it feels overwhelming. I’ll walk you through each interval as you follow along. As you practice, it will become clearer and more intuitive.
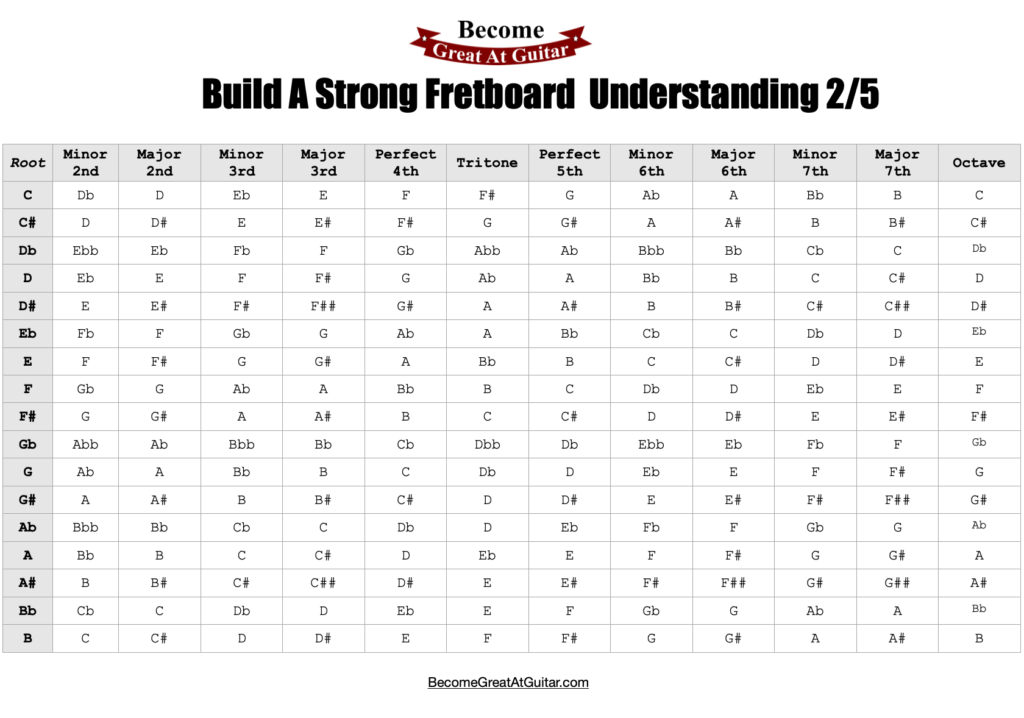
Once you’ve gone through this exercise a few times, counting intervals will feel like second nature. If you’re ever unsure, refer back to the interval chart provided. This way, you can double-check your work and ensure you’re getting the fundamentals down correctly.
The Second Intervals
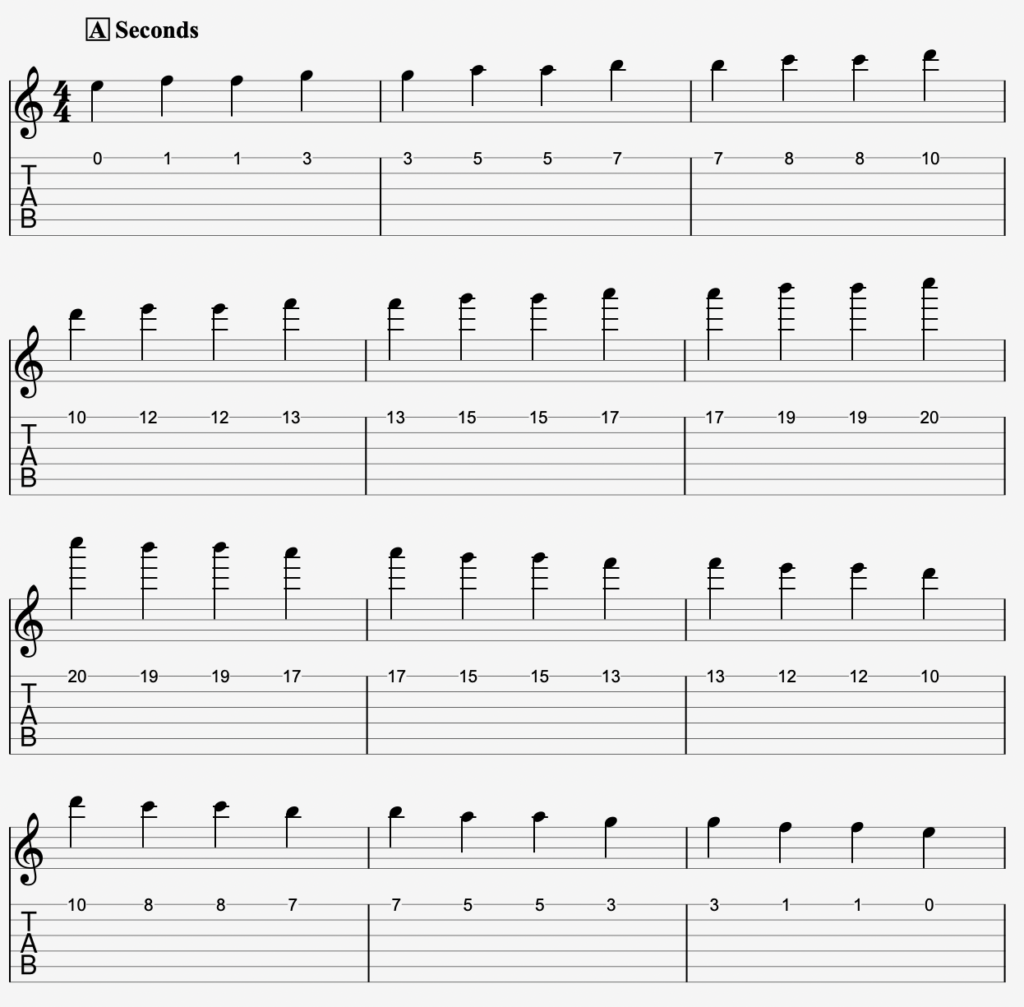
A second interval can be either a minor second, which is the distance of one fret, or a major second, which is the distance of two frets. Counting is simple—you just move two positions up: 1, 2.
E to F:
Starting on the high E string, count “1, 2” moving from E to F. This is a minor second because it covers one fret.
F to G:
Next, count “1, 2” from F to G. This is a major second since it covers two frets.
G to A:
Finally, count “1, 2” moving from G to A, which is another major second.
Here’s the full exercise played on the high E string:
The Third Intervals
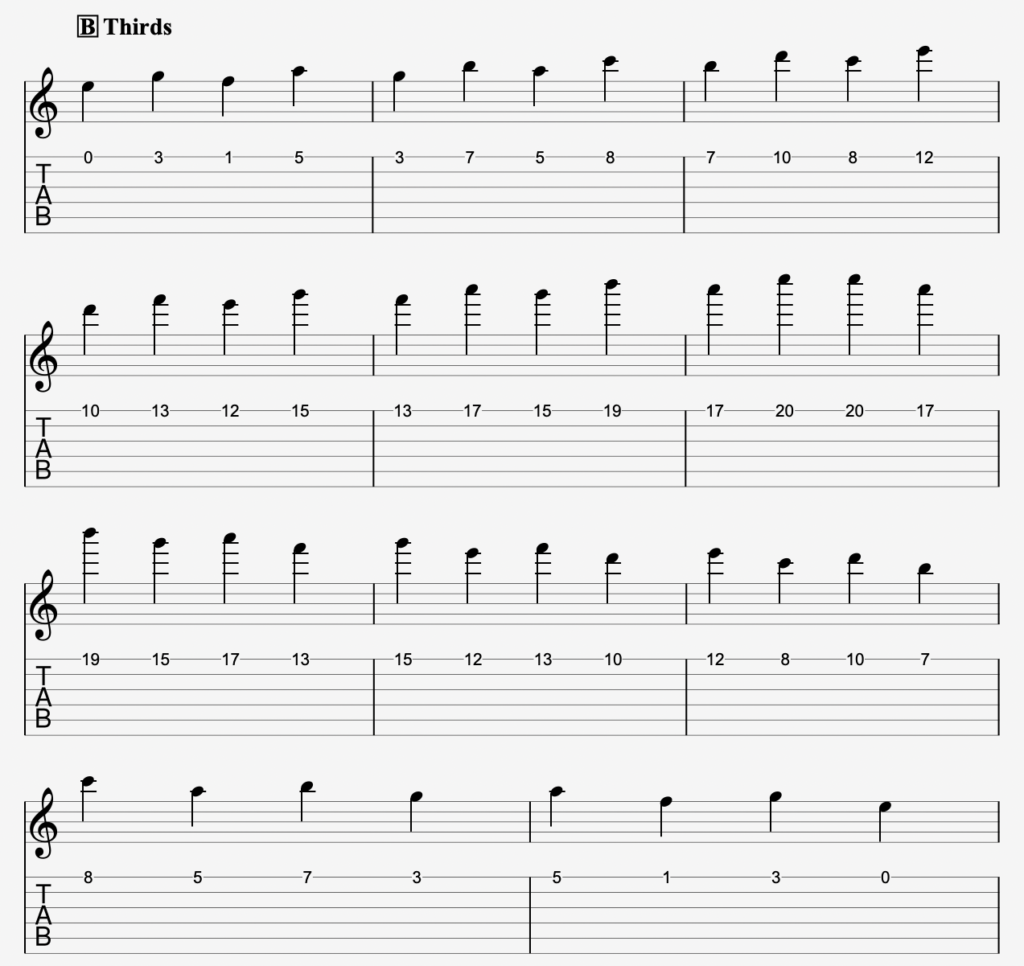
Third intervals are straightforward and comfortable to play. They are either a minor third (the distance of 3 frets) or a major third (the distance of 4 frets). Counting is simple—you just count to three: 1, 2, 3.
E to G:
Start on the high E string. Counting “1, 2, 3” from E to F to G, this is a minor third.
F to A:
Next, count “1, 2, 3” from F to G to A. This is a major third since it spans 4 frets.
G to B:
Finally, counting “1, 2, 3” from G to A to B is another major third, spanning 4 frets.
Here’s the entire exercise on the high E string:
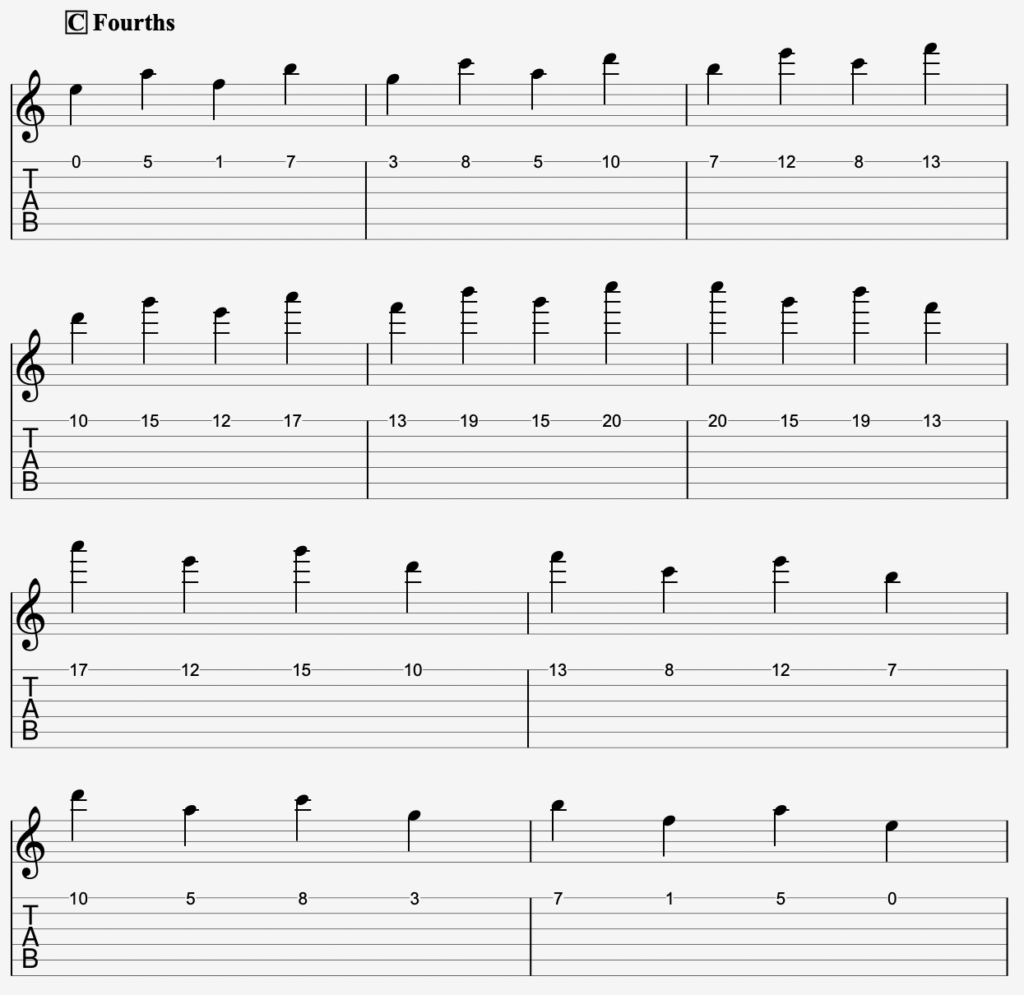
The Fourth Intervals
Perfect fourth intervals are a bit stretchy, but still manageable without needing to move your fretting hand too much. A perfect fourth spans 5 frets. However, there’s an exception when playing a perfect fourth from F to stay within the key of C. More on that in a moment.
Counting is simple: 1, 2, 3, 4.
E to A:
Starting on the high E string, count “1, 2, 3, 4” from E to F to G to A. This gives you a perfect fourth.
F to B (Exception):
Next, count “1, 2, 3, 4” from F to G to A to B. This is not a perfect fourth but a tritone. A perfect fourth from F would be B♭, but since B♭ is not in the key of C major, we use B. The distance from F to B is 6 half steps, which is a tritone.
G to C:
Finally, moving from G to A to B to C gives you a perfect fourth again, spanning 5 frets.
Here’s the entire exercise:
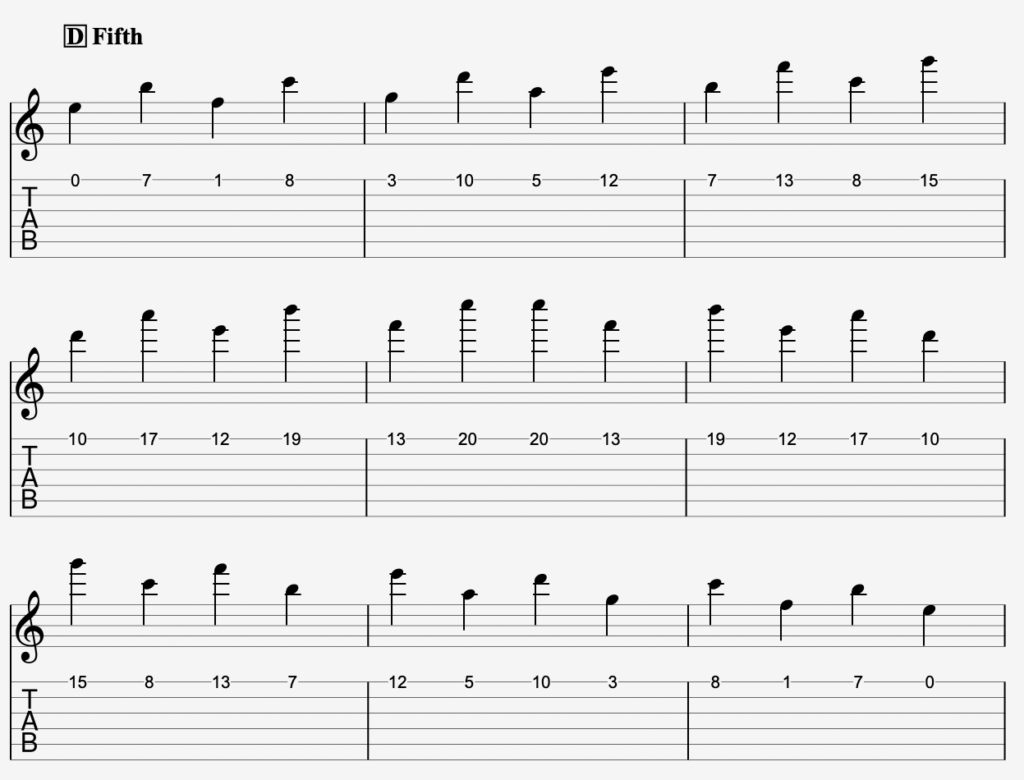
The Fifth Intervals
Playing perfect fifth intervals requires a bit more hand movement to change positions. A perfect fifth spans 7 frets, but there’s an exception when moving from B. We’ll cover that shortly.
Counting goes like this: 1, 2, 3, 4, 5.
E to B:
Starting on the high E string, count “1, 2, 3, 4, 5” from E to F to G to A to B, giving you a perfect fifth.
F to C:
Next, count “1, 2, 3, 4, 5” from F to G to A to B to C.
G to D:
Moving from G to A to B to C to D gives you a perfect fifth, spanning 7 frets.
A to E:
Moving from A to B to C to D to E is another perfect fifth.
B to F (Exception):
For the interval from B to F, you encounter a tritone. A perfect fifth from B would be F#, but since F# is not in the key of C, we use F. This interval, from B to F, is either called a tritone or a diminished fifth.
Here’s the entire exercise:
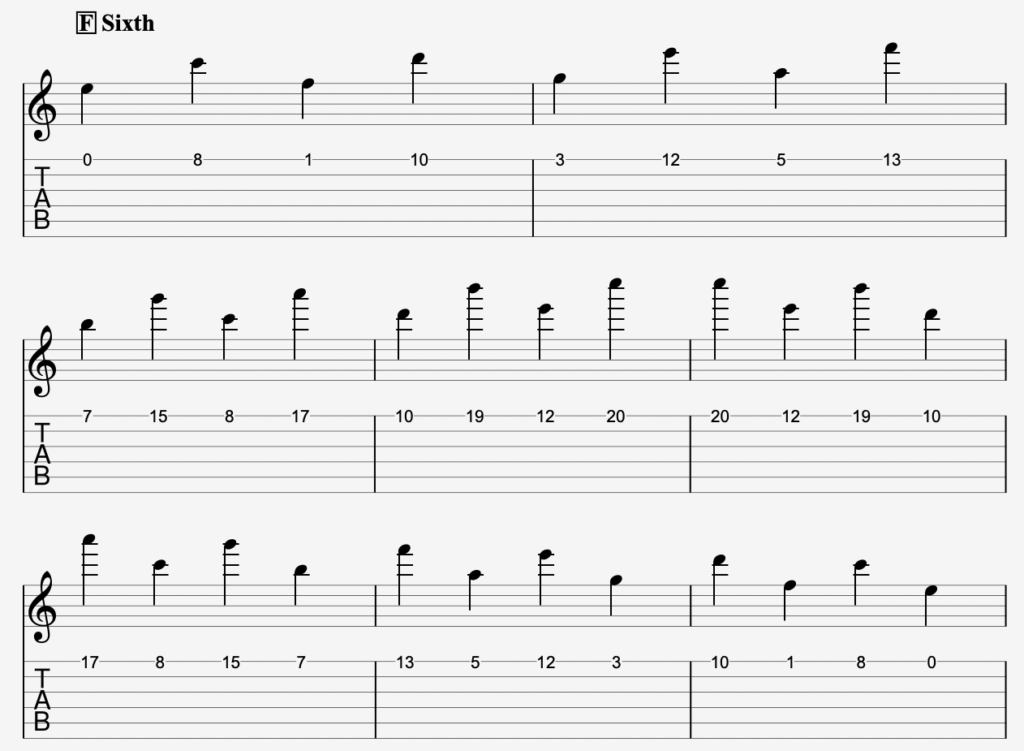
The Sixth Intervals
A sixth interval can be either a minor sixth (the distance of 8 frets) or a major sixth (the distance of 9 frets). Counting is straightforward—just count to six: 1, 2, 3, 4, 5, 6.
E to C:
Starting on the high E string, count “1, 2, 3, 4, 5, 6” from E to F to G to A to B to C. This is a minor sixth.
F to D:
Next, count “1, 2, 3, 4, 5, 6” from F to G to A to B to C to D. This is a major sixth because it spans 9 frets.
G to E:
Moving from G to A to B to C to D to E is another major sixth since it also spans 9 frets.
Here’s the entire exercise:
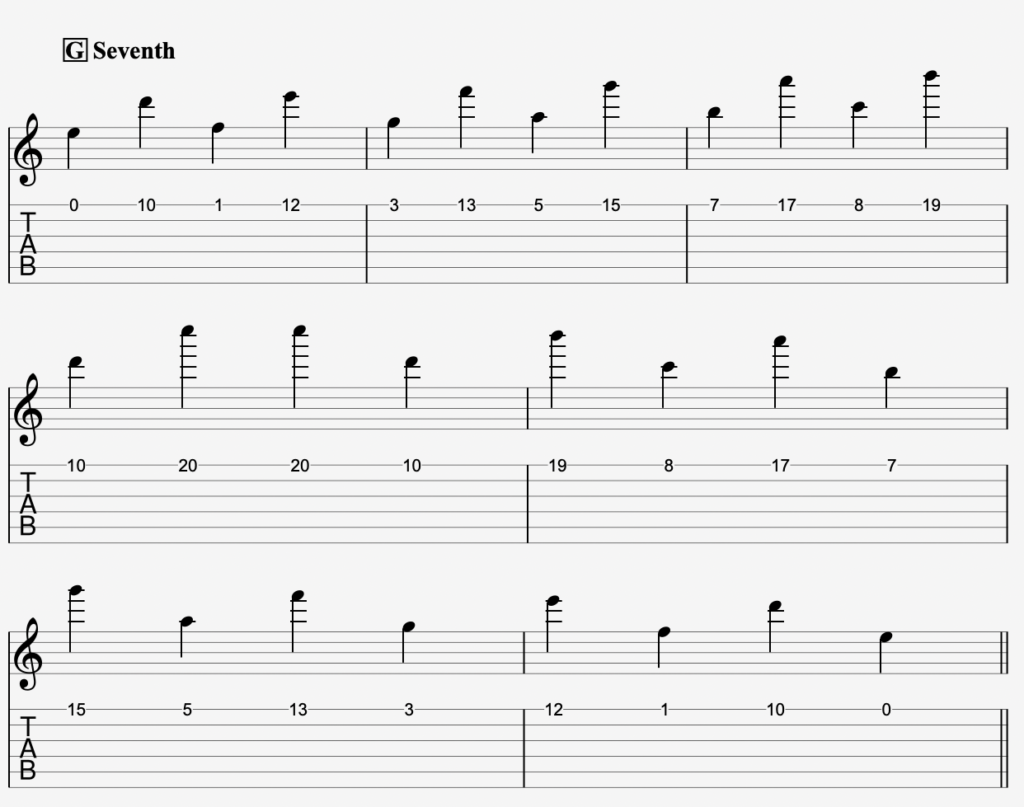
The Seventh Intervals
A seventh interval can be either a minor seventh (the distance of 10 frets) or a major seventh (the distance of 11 frets). Counting is straightforward—just count to seven: 1, 2, 3, 4, 5, 6, 7.
E to D:
Starting on the high E string, count “1, 2, 3, 4, 5, 6, 7” from E to F to G to A to B to C to D. This is a minor seventh.
F to E:
Next, count “1, 2, 3, 4, 5, 6, 7” from F to G to A to B to C to D to E. This is a major seventh because it spans 11 frets.
G to F:
Moving from G to A to B to C to D to E to F is another minor seventh because it spans 10 frets.
Here’s the entire exercise played up and down the high E string:
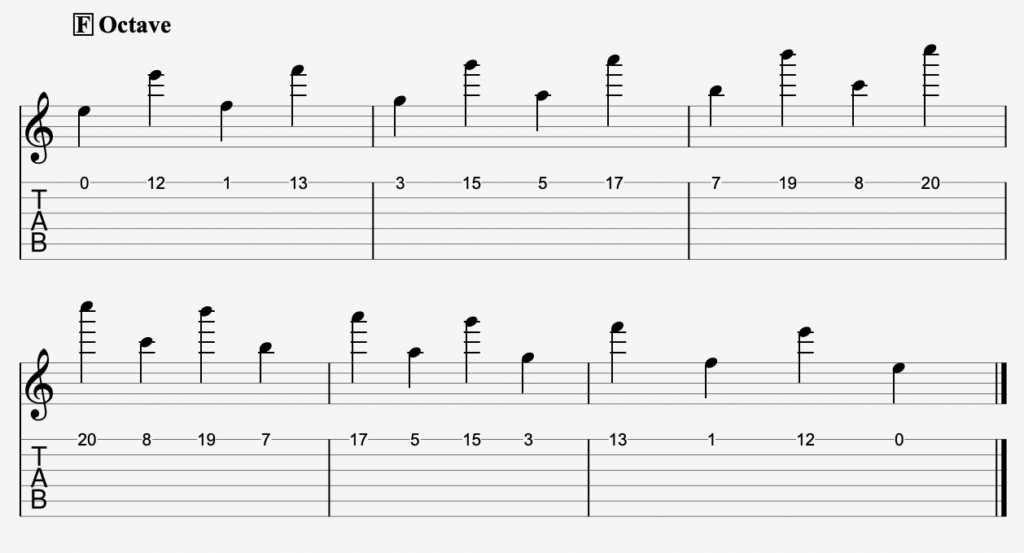
The Octave Interval
The octave interval is straightforward because the note names are identical. For example, the octave of E is also E. You don’t need to count this out in detail, but the basic idea is to count to eight: 1, 2, 3, 4, 5, 6, 7, 8.
E to E:
Starting on the high E string, count “1, 2, 3, 4, 5, 6, 7, 8” from E to F to G to A to B to C to D to E. This is an octave.
F to F:
Next, count “1, 2, 3, 4, 5, 6, 7, 8” from F to G to A to B to C to D to E to F. This is another octave.
G to G:
Moving from G to A to B to C to D to E to F to G is also an octave.
Practice Variations for Horizontal Intervals
This exercise is quite comprehensive, with many possible variations to explore. How you practice will depend on your skill level and the time you can dedicate. The key factors to consider are the string you’re playing on, the key you’re practicing in, and the interval you want to focus on.
Here’s a breakdown of possible practice combinations:
- A Single String, Single Key, Single Interval
- A Single String, Single Key, Multiple Intervals
- A Single String, Multiple Keys, Single Interval
- A Single String, Multiple Keys, Multiple Intervals
- Multiple Strings, Single Key, Single Interval
- Multiple Strings, Single Key, Multiple Intervals
- Multiple Strings, Multiple Keys, Single Interval
- Multiple Strings, Multiple Keys, Multiple Intervals
You can choose to practice in any combination that suits your needs. To help you get started, here’s a rough guide for different skill levels. Feel free to adapt these suggestions based on your own progress and goals:
Beginner Level
- Single String, Single Key, Single Interval
- Multiple Strings, Single Key, Single Interval
Intermediate Level
- Single String, Single Key, Multiple Intervals
- Multiple Strings, Single Key, Multiple Intervals
- Single String, Multiple Keys, Single Interval
Advanced Level
- Single String, Multiple Keys, Multiple Intervals
- Multiple Strings, Multiple Keys, Single Interval
- Multiple Strings, Multiple Keys, Multiple Intervals
Choose the practice variation that best aligns with your current skill level and goals, and don’t hesitate to mix and match as you progress.
Whats next?
Be sure to go through all the intervals I’ve shown you, at least for the key of C major. I understand that learning and locating these intervals can be time-consuming and might even feel tedious at first. However, this is where the rubber meets the road because this is the kind of work that most guitar players avoid, leading them to get stuck because they don’t learn these fundamentals.
I know learning intervals might not seem exciting, but they form the foundation of almost everything you’ll encounter in music theory. You can’t fully understand scales, chords, or chord progressions without being familiar with intervals. Since this topic is so crucial, in part three of this series, I will explain the music theory behind intervals in a more nuanced way. This will help you understand intervals better and prevent confusion in the future.
Until then, focus on practicing this exercise and getting comfortable with horizontal intervals. We’ll cover vertical intervals and delve deeper into the music theory in the next Part.
Here it is: How to build a strong fretboard understanding 3/5 – Vertical Intervals.
Stay tuned, and Have Fun!


Great lesson Gregor!
The way you’ve laid this out is really helping me understand both the guitar and music theory. In a way I’ve never really grasped before. Thanks so much!
Dave
Hey Dave,
Thank you so much for your feedback! I’m glad to hear that my lessons are helping you. We’re only in Part 2, so I’m excited to hear about your progress once you’ve completed the entire 5-part series. Thanks for giving it a go!
Cheers,
Gregor