Feel free to download the resources for this lesson. There, you’ll find the tabs for all intervals and some additional tools that you can print out and use in your guitar practice.
Just in case you have missed parts 1, 2 & 3:
Part One is on How to Build a Strong Fretboard Understanding 1/5 – Horizontal Diatonics. There, I show you a great exercise on how you can learn all the notes on the fretboard and simultaneously develop a good technique. Start there if you haven’t already. It’s the most important foundation you need for almost everything.
Part Two covers How to Build a Strong Fretboard Understanding 2/5 – Horizontal Intervals. You need to learn this before you start the exercises here, or at least I highly recommend it. In that part, you learn the intervals in a more tangible and visual way, so check that out as well.
Part three is How to Build a Strong Fretboard Understanding 3/5 – Vertical Intervals. In this part I show you a comprehensive method on how to play intervals vertically across the entire fretboard. I also explain the music theory of intervals in more depth.
Table of Contents
Scale Chunks
Many guitarists struggle with huge diagrams that cover the whole fretboard and find it difficult to make them work in their playing, but what if there’s a better way?
I’ll show you how to conceptualize scales into smaller, easy-to-remember chunks that give you the freedom to move more fluidly across the fretboard.
Another great thing is that this concept is not just for the major scale—you can apply this method to every scale, whether it’s a major, minor, pentatonic scale, or even when playing modes.”
So if you’ve been following along, this should be a relatively easy lesson and could be a valuable concept that can help you simplify learning and using scales properly. Grab your guitar, and let’s get started.
The Problem with Traditional Scale Learning
Why Traditional Scale Diagrams Are Problematic
Before we dive into the method of playing scales, let me first briefly explain what the problem with traditional scale diagrams is.
When you first start learning scales, you likely encounter different diagrams for the same scale. Depending on who you ask, you’ll get a different answer on how many diagrams you need to cover the entire fretboard. Oftentimes, it’s 5 to 7 diagrams.
The idea is that you learn, lets say, five basic diagrams. You start with diagram one, then move to two, three, four, and five, and by doing so, you’ve covered half the fretboard.
And The other half can be covered with the same diagrams, just an octave higher, so after diagram five, you start back at diagram one and repeat until you reach the end of the fretboard.
So far, so good. You now have a map of the entire fretboard with just five diagrams. But what’s the problem?
There are two main issues with that, and they’re connected.
Guitar-Only Construct Without Musical Context:
These diagrams only show where the right notes of a scale are located on the fretboard. Of course, this is helpful, but it comes with a set of problems, which I’ll get to in a minute.
Too Large to Digest:
Each diagram stretches across three different registers, which is way too much to process, especially if you’re just starting out with improvisation. Most licks and musical ideas should be simple, often contained within a single register. Being confronted with three registers at once can be overwhelming.
Now, let me explain how these two issues create problems in learning scales.
The 1st Problem: It's a Guitar-Only Construct

Let’s take a look at a common diagram: the A minor pentatonic. Most guitarists learn this shape early on to kickstart their soloing.
This diagram starts on the root note (A) and ends on the minor third (C). But in reality, a scale is usually defined as going from root note to root note. For the A minor pentatonic, this would be A, C, D, E, G, A. So, it should start on A and end on A.
On every other instrument, this is a rule that is set in stone. You always play a scale from root to root—no exceptions. Whether you practice it straight up and down or in sequences, you always ascend from the root note and descend back to the root.
Issues with Guitar Diagrams
Now, let’s look at how the pentatonic diagrams are organized on the fretboard:

Diagram 1: Starts with an E on the low E string and ends on G.
It’s not root to root. To practice it correctly, you should start on the A string and stop at the highest A on the G string, second fret
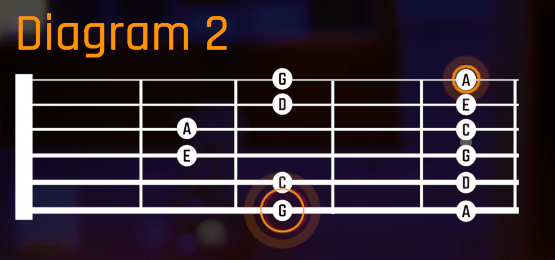
Diagram 2: Starts on G and ends on A on the high E string.
Again, you shouldn’t practice from G to A. Instead, begin on A.
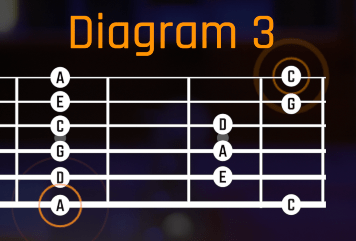
Diagram 3: This diagram starts on A and ends on C.
You can fix this by simply avoiding the C and focusing on the A notes within the shape.

Diagram 4: Starts on C and ends on D.
It’s hard to make this diagram work properly because the lowest A is on the D string, and the highest A is on the B string at the 10th fret.
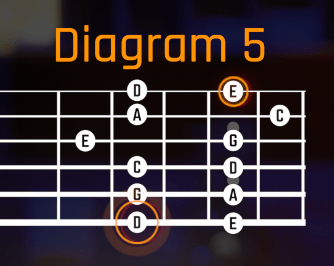
Diagram 5: Starts on D and ends on E.
You could make this work by starting on the A at the 12th fret on the A string and ending on the A on the B string’s 10th fret.
The Same Problems Apply to Other Scales
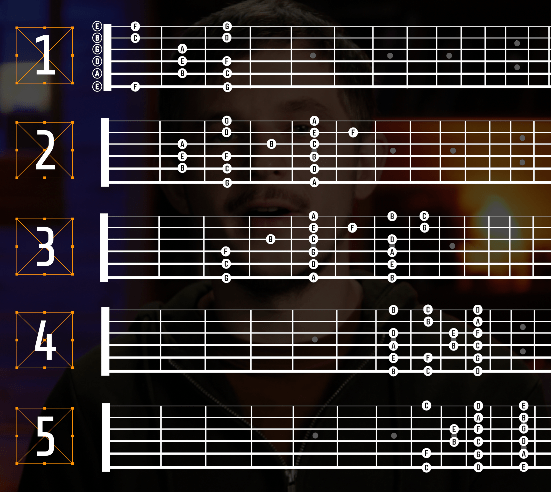
This issue isn’t unique to the pentatonic scale. You’ll encounter the same problem when learning other scales with diagrams. Lets briefly take the major scales for example:
take a look at the five diagrams for the major scale
- The first diagram for a major scale goes from E to G.
- The second goes from G to A.
When you check the remaining diagrams, you’ll see the exact same problem as with the pentatonic diagrams.
But why is that a problem that the order is not organized by starting on the root note and stopping on the root note?
Well, A scale is a theoretical construct, it is defined by a specific structure, for the major scale like the structure is
whole step, whole step, half step, whole step whole step whole step and half step.
And this results in a specific sound that you will get familiar with if you’re practice it over and over.
Now, if you just play and practice the diagrams in the order they are displayed, you’ll play the right notes but ignore the correct sequence, which results in a different scale and distorts its sound.
So, please remember that the order in which you play and practice scales is important. Otherwise, you’re not really practicing it properly.
2nd Problem: It is Too Large to Digest
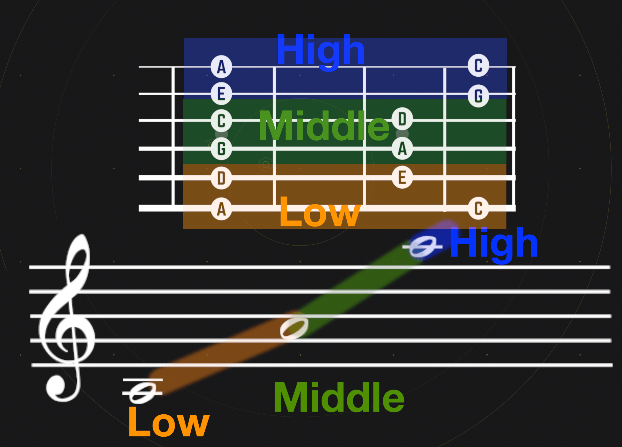
So, what do I mean by “too large to digest”?
Take a look at the note range of such a diagram. It goes from this A to this C.
It spans across three different registers: the low, mid, and high registers.
This is problematic for many beginner and intermediate guitarists. When you’re tasked with improvising a blues solo, dealing with three registers at once can be overwhelming. The challenge is to create good phrases, licks, and authentic musical statements. At first, you need to do this within the boundaries of a single register.
Most good licks aren’t complicated, but they coherent because they were played within just one register.
But because we guitarists are often taught scales that cover three registers at once, we end up doing that typical “scale poking” or “scale walking,” where we just play the diagram up and down.
You know what I mean. It often happens when it’s our turn to play a solo: and we end up playing the diagram instead of a musical idea.
That’s the result of this method. We learned the diagram, it spans three registers, and we assume we have to play through all of them immediately. But we don’t! That’s not how we should approach it.
As a result, it becomes difficult to break out of this pattern, and we get trapped in these diagrams, and forming bad habits that take time to undo.
The good news is that this is preventable by approaching scales in small and manageable chunks, like the method I’m about to show you. So let’s dive into how this works.
How Scale Chunks Work
Scale chunks are played by dividing any scale into manageable one-octave sections. Let me show you how this works using the C major scale.
To understand the scale chunk method, you first need to know that the guitar’s note range goes from low E to high D (on a typical guitar with 22 frets). Some guitars have only 21 frets, while others go up to 24, which will slightly change the upper note range. But within this range, we can divide the fretboard into different registers.
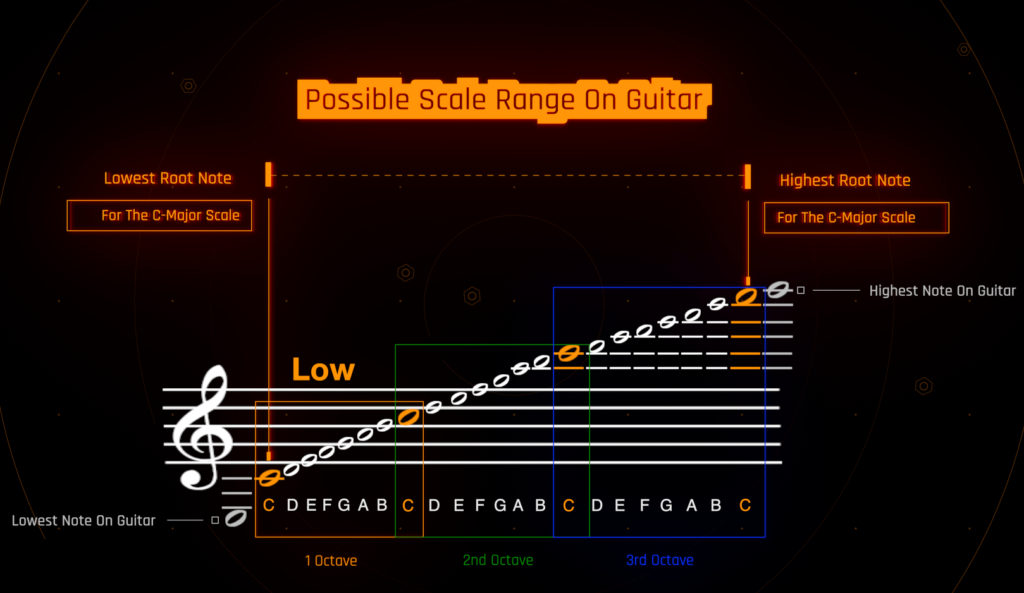
As you can see, the scale spans three registers: the low, middle, and high registers. In other words: On Guitar it’s possible to play the C Major from C to C, in three different octaves.
That’s the only possible range we can play.
Now, here’s where things get interesting. On guitar, you can play the same note in multiple places on the fretboard. Therefore you can play an entire scale on different positions as well.
To simplify things, we focus on one register at a time and explore all the possible positions within that register.
Let’s start with the lower register. Here are all the possible positions for the C major scale in that register:

There are six different positions to play the same scale in this register.
Now, let’s move to the middle register:
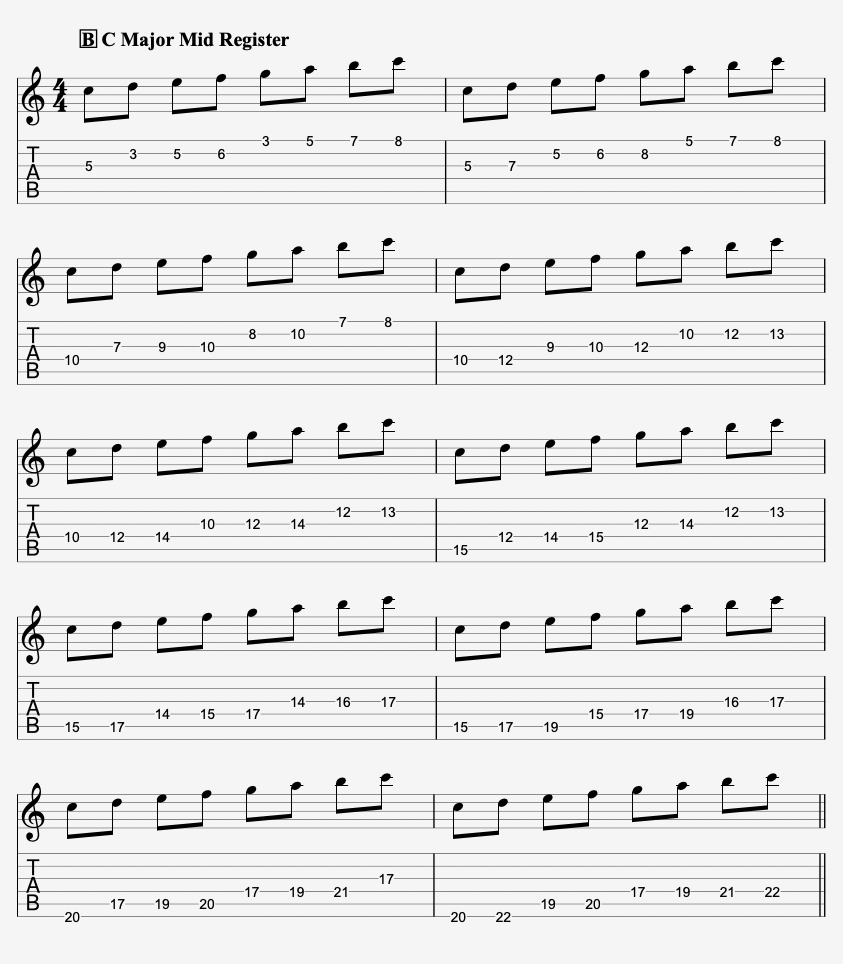
Here, you can play the scale in ten different positions. As you may guess bey now. This variety is one of the reasons guitarists often find the instrument challenging!
Finally, let’s look at the higher register:
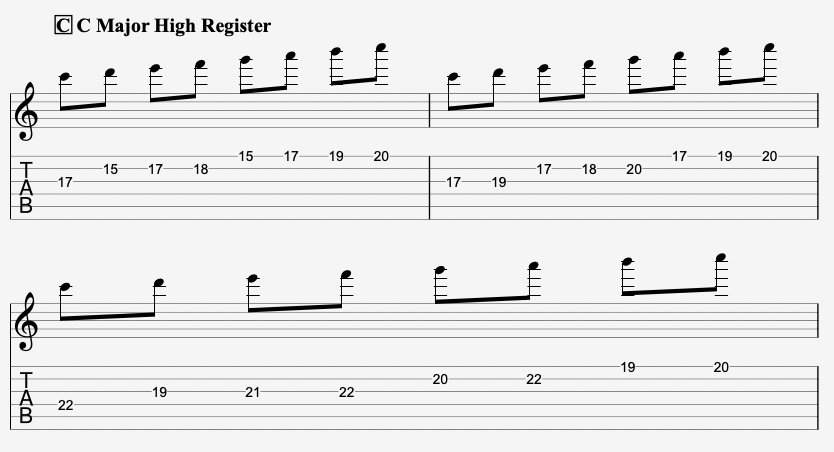
Let me mention that it is possible to find more positions for each register, but then it becomes less practical because some of these positions can be uncomfortable to play.
I encourage you to practice this method in different keys. You will notice that the number of scale chunks per register varies slightly depending on the key.
How to Practice Scale Chunks
Ok, Now that you understand the concept, here’s are five tips on how to practice it:
Start Simple: Begin with one key (C major, for example) and focus on learning one register at a time. If you’re not familiar with playing scales, this exercise shouldn’t be too challenging if you’ve completed the earlier exercises in this series. By now, you should already be able to locate the note names on the entire fretboard. If not, I encourage you to go back to Part 1 and review those exercises.
Play Each Chunk Up and Down: For each scale chunk, play it simply, like this: (Play example)
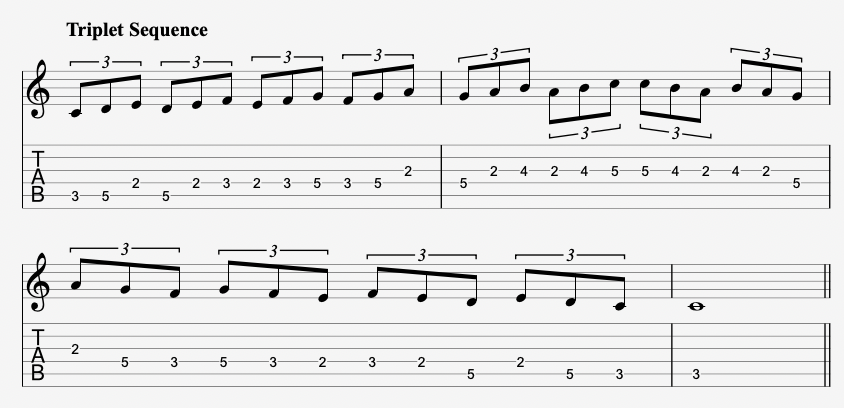
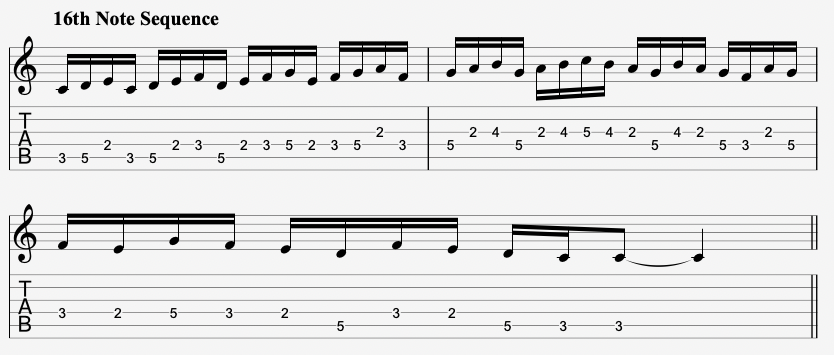
Explore Variations: Once you’re comfortable, try playing the scale in sequences. For example:
- Here is Triplet note sequence:
- Or Try a Sixteenth note sequence like this:
- Or even this sequence here:

4. Explore Different Fingerings: One of the challenges of learning scales is finding the right fingering that feels comfortable for you. Your task is to discover these fingerings, but relax—this will change over time as your skills develop. You can create new fingerings for different situations. It’s more of a flexible process than a rigid one.
5. Improvise with One Chunk: Pick one scale chunk and make music with it. Improvise within its limitations. This helps you focus on creating melodies, licks, and musical statements, rather than just running through the notes. Limiting yourself to one chunk is a great way to avoid mindless “scale poking” and instead focus on sounding musical.
Connecting the Chunks
Once you’ve mastered the scale chunks, you’ll be able to connect them for longer scale runs. One of the biggest advantages of this approach is that you’re not confined to the typical 5-7 long scale diagrams. You’ve learned the smaller puzzle pieces that scales are made of, which makes it easier to connect them across the fretboard.
After practicing this method for a while, you can even reverse-engineer the traditional scale diagrams or come up with your own connections that span two or three octaves. Be playful and see how you can integrate this approach into your playing.
Lastly, make sure to practice in multiple keys so that you develop a well-rounded understanding of the fretboard.
Outro
Alright, that’s how scale chunks work! Now, before you go, make sure to spend some time practicing those different registers and positions—this will really open up the fretboard for you. And don’t worry, it all comes together step by step.
Just In case you have missed the previous Lesson:
Part 1: Horizontal Diatonics (Learn The note names on the fretboard)
Part 2: Horizontal Intervals
Part 3: Vertical Intervals
In the next episode, we’re going to dive into triads, which are absolutely essential for any guitarist. If you want to master your chords, build more musical phrases, and learn proper improvisation, learning triads is a must. Trust me, you won’t want to miss it!
So, keep an eye out for that, and in the meantime, don’t forget to download the tabs and worksheets to help you along. See you in the next lesson!

